Sunday, July 29, 2012

Delete File using Java

In continuation to my last post, Creating a File in Java, I am writing this post to show how to delete a file. It's very simple, you just use the delete() method of the File class and done. The method returns a boolean, true if the file is successfully deleted otherwise false. Here is an example:


package home.flicker.java.io.file;

import java.io.File;

/**
 * @author fLiCkEr
 * Example to show how to delete a file.
 */
public class FileDeletion {

  public static void main(String[] args) {
    try {
      File fileToDelete = new File("test.txt");
               if (fileToDelete.delete()) {
System.out.println("File deleted!!!");
      } 
      else {
System.out.println("Can't delete file!!!");
      }
    } catch (Exception e) {
       System.out.println("Error deleting file: " + e.getMessage());
    }
  }
}


Creating a file in Java

Until now, the posts I wrote were on setting up development environment but for the first time I am gonna write something about coding. It's a simple tutorial on how to create files in Java. It's nothing fancy but just a point for me to start and take you into a bit of programming. So let's get started. 

There are many times when you need a file during development may be to write some data (could be a txt or csv or your own format). It's very simple to create a file. You simply need to use the File class from the Java IO. It has many methods and one of them is File.createNewFile().

The steps are: 
  1. Create a File object: 

    File fileToCreate = new File("nameOfFile");
  2. The second step is to create the file:

    fileToCreate.creatNewFile() 
And that's all. Here is example code:


package home.flicker.java.io.file;

import java.io.File;
import java.io.IOException;
import java.util.Scanner;

/**
 * @author flicker
 * Example to create a file with user given name.
 */
public class FileCreation {

  public static void main(String[] args) {
    Scanner scanner = new Scanner(System.in);
    System.out.println("Enter name of File you want to create: ");
    String fileName = scanner.next();
    File fileToCreate = new File(fileName);
    try {
if(fileToCreate.createNewFile()){
       System.out.println("File created!!!");
      }
else{
       System.out.println("Can't create new file as it already exists!!!");
}
    } catch (IOException e) {
System.out.println("Error while creating file!!! " + e.getMessage());
    }
  }
}


Here is a screen-shot of the output:


The example code is pretty simple and self explanatory. Share your issues or confusions. 
I will be posting more on File reading, writing and other file related operations. 


Wednesday, July 18, 2012

Say Hello to Python Flask Server

What is Flask Server?


From the official Flask website, Flask is a micro web development framework for Python based on Werkzeug (a WSGI utility library for Python),  Jinja 2 (a modern and designer friendly templating language for Python) and good intentions. It's released under BSD license
Some of the features of flask are: 
  • Built-in development server and debugger.
  • Integrated support for unittesting support. 
  • RESTful request dispatching. 
  • Uses Jinja 2 templating. 
  • Support for secure Cookies. 
  • 100% WSGI 1.0 complaint. 
  • Unicode based.
  • Extensively documented.
So, enough of the theoretical detail, lets start with the practical :). 

 Installation 

Flask depends on two external libraries, Werkzeug and Jinja2. So how do we get it to our local machine? There are many ways to do it but I did it with virtualenv. Now, for someone like me who is new to Python, the next question is "What the hell is a virtualenv?". Well virtualenv is a tool to create isolated Python environments. You can find more details on the official website.

So how do we get virtualenv. Well that's very simple. 

Note: 

1. The installation I did was on a Linux Fedora 14 machine with root privileges, there is a possibility that few of the commands can differ from one version of Linux to another.
2. Another thing, I am considering that you already have Python, python-setup-tools and python-pip installed on your machine. In case you don't have it and don't know how to get it see my last post "Getting Ready with Python-PIP".

Installing Virtualenv

You can get virtualenv package using easy_install or python-pip. In my case, I used python-pip. fire up a shell and run following commands: 

pip-python install virtualenv
This command will give you this:
[root@localhost dev]# pip-python install virtualenv

Downloading/unpacking virtualenv
Downloading virtualenv-1.7.tar.gz (2.1Mb): 2.1Mb downloaded
Running setup.py egg_info for package virtualenv

warning: no previously-included files matching '*.*' found under directory 'docs/_templates'
Installing collected packages: virtualenv

Running setup.py install for virtualenv

warning: no previously-included files matching '*.*' found under directory 'docs/_templates'
Installing virtualenv script to /usr/bin
Successfully installed virtualenv
Cleaning up...
[root@localhost dev]#

Once the virualevn installation is done the next step is to setup a virtual environment. 

Setting up virtual environment with virtualenv

To setup a virtual environment for python with virutalenv is very simple. 
Step 1 is to create a folder in which you want to have python virtual environment and then create  virtualenv folder within it. Run following commands:
mkdir flaskTestServer
cd flaskTestServer
virtualenv venv
The above set of commands will give you following: 
[root@localhost Dev]# mkdir flaskTestServer
[root@localhost Dev]# cd flaskTestServer/
[root@localhost flaskTestServer]# ll
total 0
[root@localhost flaskTestServer]# virtualenv venv
New python executable in venv/bin/python

Installing setuptools............done.
Installing pip...............done.
Once that's done you just have to activate the virtual environment you just created: 
[root@localhost flaskTestServer]# . venv/bin/activate
(venv)[root@localhost flaskTestServer]#
And you are all set to install you flask server in your own virtual environment. 

Installing Flask Server

Simply run following command:
(venv)[root@localhost flaskTestServer]# pip install flask
And you are all set to start developing your own flask server and run it. 

Example

Now lets make a flask web server to say hello to the world. It's very simple, very very simple.
Make a python script, lets say flaskHelloWorld.py and put in following code: 

from flask import Flask
app = Flask(__name__)
@app.route('/')
def hello_world():
    return 'Hello World!'
if __name__ == '__main__':
    app.run()
So, what did we do here: 
  1. First we imported the Flask class. An instance of this class will be our WSGI application. The first argument is the name of the application’s module. If you are using a single module (as in this example), you should use __name__ because depending on if it’s started as application or imported as module the name will be different ('__main__' versus the actual import name). For more information, have a look at the Flask documentation.
  2. Next we create an instance of this class. We pass it the name of the module or package. This is needed so that Flask knows where to look for templates, static files, and so on.
  3. We then use the route() decorator to tell Flask what URL should trigger our function.
  4. The function is given a name which is also used to generate URLs for that particular function, and returns the message we want to display in the user’s browser.
  5. Finally we use the run() function to run the local server with our application. The if __name__ == '__main__': makes sure the server only runs if the script is executed directly from the Python interpreter and not used as imported module.
And run it with Python.
(venv)[root@localhost flaskTestServer]# python flaskHelloWorld.py
 
* Running on http://127.0.0.1:5000/
Now open up a browser and go to the address  http://localhost:5000/ or http://127.0.0.1:5000/ and flask will say hello to you like in the screen-shot below:


And that's it. Wasn't that easy :).


Tuesday, July 17, 2012

Maven Repositories and configuration

I have recently started writing about Apache Maven. What I wrote till now and what I am going to write in this post are quite basic stuff about Maven, the must know kind of stuff.


So till now I have written about the Apache Maven - Setting Up and Configuring Maven Local Repository in my previous posts. What I am going to write now is about the different types of repositories in Maven. How you can configure them and some basic theoretical explanation on this. From my point of view, these are some of the basic stuff one should know before getting their hands dirty with Apache Maven.


What is Repository?

A repository in maven is like a library in real world. Its a place where all the build artifacts and dependencies of varying types are stored. According to Apache Maven documentation, there are strictly two types of repository, local and remote. 

Different types of Maven Repositories

So, to start with, there are 3 types of Maven repositories:
  • Maven Local Repository.

    Maven local repository is like a library we have at home with books which only concern us. Here in this case, it's a place on our own machine where all the dependency libraries of your project which have been downloaded using Maven are stored. These files usually include plugin jars. It acts as a cache of the remote downloads. 
  • Maven Remote Repository.

    Now, the Remote Repository is like a public libraries in real world. Anyone can access it. In Maven's case, it refers to any repository which one can access using variety of protocols like file:// or http://. Now these repositories can be at least two types:
    • Third-Party public repository
      These are truly remote repository which are completely public, set up by a third party to provide their artifacts for downloading like maven2 repo.Also, you can search for dependencies here. You need an internet connection to connect to these repositories.

    • Internal Repositories
      These are internal repositories set up within an organization with limited access to their own network. It's used to share private artifacts between development teams and for releases. You need at least a network connection (not internet specifically until and unless the repository is at another geographical location) to connect to these repositories.

How to use/configure repositories?

  • Maven Local repositories.

    In general, there is no need to do anything with the local repository on regular basis, until and unless you are required to free some disk space and you need to do a clean up or you can erase it provided you are willing to download everything from beginning.
    For configuring the local repository see my old post Configuring Maven Local Repository.
  • Maven Remote repository.

    Central and Third Party Repository:
    You can use these to download dependencies and sometime upload provided you have permission to do so.
Maven Central Repository
Downloading a dependency in Maven is triggered as a result of missing dependency in the local repository. By default, Maven will look for dependency in the central repository which is set to look in maven2 repo.
The central repository is managed by Maven community. You can edit the setting.xml for maven to globally use some other repository or you can edit in the project's pom.xml, which will only work for that project.
Now let's see how can we configure Maven (pom.xml) to look for a dependency in a remote repository (not the central repository). 
<project> 
   .....
   <dependencies>
      <dependency>
         .....
      </dependency>
      .....
   <dependencies>
   .....
   <repositories>
      <repository>
         <id>organization-name.lib1</id>
         <url>http://download.organization-name.org/maven2/lib1</url>
      </repository>
      <repository>
         <id>organization-name.lib2</id>
         <url>http://download.organization-name.org/maven2/lib2</url>
      </repository>
      .....
   </repositories>
   .....
</project>
Maven Internal Repository:
Using the internal repository is quite simple. You just add the repository element and mention the location of internal repository. Something like this:
<project>
  ...
  <repositories>
    <repository>
      <id>my-internal-site</id>
      <url>http://myserver/repo</url>
    </repository>
  </repositories>
  ...
</project>
If your internal repository requires authentication, an id element can be used in the settings file to specify login information.
<settings xmlns="http://maven.apache.org/SETTINGS/1.0.0"
  xmlns:xsi="http://www.w3.org/2001/XMLSchema-instance"
  xsi:schemaLocation="http://maven.apache.org/SETTINGS/1.0.0
                      http://maven.apache.org/xsd/settings-1.0.0.xsd">
  ...
  <servers>
    <server>
      <id>server001</id>
      <username>my_login</username>
      <password>my_password</password>
      <privateKey>${user.home}/.ssh/id_dsa</privateKey>
      <passphrase>some_passphrase</passphrase>
      <filePermissions>664</filePermissions>
      <directoryPermissions>775</directoryPermissions>
      <configuration></configuration>
    </server>
  </servers>
  ...
</settings>
After studying a little a about Maven, in my opinion it's not that difficult. What do you think? Share your experience and issues related to maven.

    Getting Ready with Python-PIP

    As I mentioned in my earlier post on Python in Eclipse [PyDev Plugin for Eclipse], that I am new to Python. I decided to post the issues I face during my Python experience. And for this post the motivation was python-pip

    What is Python-pip?

    pip is a tool for installing and managing Python packages, like the ones which can be found under the Python Package Index. It's a replacement for a previous tool, easy_install. More details can be found here.

    Dependencies of Python-pip

    • Python 2.7: If you don't have python installed then you can follow the instruction from Tutorial Point.
    • Python setup tools.
      In case if you don't have python-setup-tools then:
      • Download the RPM installer package for python-setup-tools. In my case I am on Linux Fedora 14 and downloaded the RPM package file from here.
      • Once you have downloaded the python-setup-tools RPM package file. Install it with RPM command from shell:
        rpm -i python-setuptools-0.6.14-3.fc14.noarch.rpm
      • And its done for python-setup-tools.

    Installing Python-pip

    After getting all the dependencies, you are all set to install the python-pip package. The first thing to do now is to download the python-pip RPM installer for your linux version. As mentioned earlier that I am using Fedora 14, I downloaded the rpm package file for python-pip from here.
    rpm -i python-pip-0.8.3-1.fc14.noarch.rpm
    After this, the you are ready to use python-pip to install python packages.

    Using Python-pip

    The list of package that can be installed using python-pip can be found here.

    To get packages:

    To get and install a package using python-pip, simply run following command: 
    $ pip install {package_name}
     or if that doesn't work then try:
    $ pip-python install {package_name}


    To uninstall a package:

    To remove a python package, run following command:
    $ pip-python uninstall {package_name}

    To upgrade a package:

    To remove a python package, run following command:
    $ pip-python --upgrade {package_name}

    I hope this helps you. Feel free to share your experience/issues.

    Sunday, July 15, 2012

    Configuring Maven Local Repository

    What is Maven Local Repository?

    Maven local repository is the place on your machine where all the dependency libraries of your project which have been downloaded using Maven are stored. These files usually include plugin jars. 

    Maven Configuration File:

    Maven local repository is defined in it's configuration file which is usually located under directory \conf with name settings.xml.

    Changing Default Maven Repository:

    By default on windows 7, the maven local repository is set for C:\Users\user_name\.m2\. You can change this by editing the settings.xml
    In the settings.xml look for the commented localRepository definition which looks like:
     

    Either un-comment it or add the following line:
    D:/dev/maven_repo
    Save the file and you are done. Now all the future dependencies will be downloaded to the path you set. 


    Refer to the Maven Repositories and Configuration post to see what types of Maven repositories are there and how you can configure them.

    Thursday, July 12, 2012

    Translate This for Firefox

    Like most of the people (internet users), I spend a lot of time surfing internet. And one of the important part of surfing internet is?? Any guesses

     A WEB BROWSER (ta da).

    There are many browsers which are available out in the market like the ancient INTERNET EXPLORER, THE MOZILA FIREFOX and the latest GOOGLE CHROME. I started my internet surfing life with MS Internet Explorer and then moved to the mighty FOX and finally moved to CHROME and stayed to it for a long time because of many of its nice features but since last few days chrome started eating up a lot of memory and it makes my PC F**KING slow and to be honest, I hate that. Also, what's with the frequent crashes, and its making me loose the love I have for Chrome.

    But even with all this bulls**t, I stayed with chrome and that was because of one reason which I miss in Firefox or Internet Explorer and that is Chrome's Web Page Translation feature. Its very handy and lets you break the barrier of language. I tried to look for some Add-ons for Firefox which can provide this web page translation feature but all of them are not as good as Chrome's web page translation.

    Then I came across a Firefox addon which I find better than other available addon is "Translate This". It's easy to install with no restart required to your Firefox and by using a simple shortcut you can get your page opened in the same tab or another tab translated to your language. At the end, it uses the Google Translate website.

    You can get this plugin from here.


    Once it's downloaded and installed, you can see it's icon at the status bar of Firefox


    Hold the SHIFT button and then right click on the "Translate This" icon on status bar and the following window will appear. Configure the addon based on your preference.


    Now everything is set and you just need to use the shortcut to translate a page. In my case I opened a french website "lemonde.fr" and after using the shortcut (CTRL+ ALT + t), I get this:

    Friday, July 6, 2012

    VirtualBox Guest Additions

    What is VirtualBox Guest Additions?

    VirtualBox Guest Additions are a package of programs and drivers which are installed on a guest OS running in VM. It helps to improve guest's performance and make integration much more seamless. There are many other features like Host/Guest Time sync, shared folders, Mouse pointer enhancements and many more. 
    Here, I will focus on how to install VirtualBox Guest Additions and how to configure Shared Folder for a Fedora virtual machine?

    Installing VirtualBox Guest Additions

    All the commands here are run with root privileges. Get the root privileges by logging in as root or use sudo in the beginning of the commands. 

    Getting required packages: 

    Once you have the Linux guest machine installed on virtual machine, install some additional packages required for VirtualBox Guest Additions like dkms, kernel-devel, etc.

    To install all the packages required run the following command: 

    yum install dkms binutils gcc make patch libgomp glibc-headers kernel-headers kernel-devel

    Mount the VirtualBox Guest Additions

    Once the package installation is done and we have the packages required by Guest Additions, lets start installing the actual thing. 
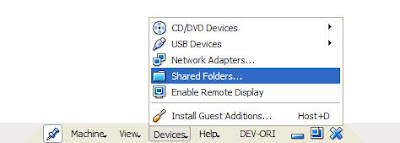
    Mount the Guest Additions ISO from VM menu using Device -> Install Guest Addition.


    Make sure there is no other CD already mounted on your virtual machine, if there is one, then unmount it. 

    Install the VirtualBox Guest Additions

    Once the mount is done, go to the shell and open the mounted Guest Additions ISO. 

    You can see different installer files, run the one which suits your requirement with following command: 
    sh VBoxLinuxAdditions.run
    Restart the machine and we are almost there... 

    Setting up the Shared Folder

    Shared Folder functionality is one of the features that comes with the VBox Guest Additions. Once VBox Addition is well installed, the next is to setup a shared folder with the host machine.
    First you need to setup shared folder. From the VBox menu open:  Devices -> Shared Folder. 

    Then choose the folder from the host machine to share with your guest machine (in my case host is Windows and guest is Linux Fedora 9).


    After this, you need to mount the shared folder on Linux guest machine.
    Create a folder where you want to mount the shared folder by 
     mkdir share-host
    then mount the folder onto the shared folder share-host.
    mount -t vboxsf share-host
     

    To do an auto-mount on each boot put the command in the /etc/rc.local or whichever script is run at the end of boot processes. 

    Sunday, July 1, 2012

    Apache Maven - Setting up

    What is Apache Maven?

    In simple words Maven is a build automation tool for Java projects. 
    There are many things which can be written for maven but to get more theoretical details  visit Apache Maven-Wikipedia page or can refer to the official Apache Maven website.


    Setting-up Apache Maven:

    Setup - Windows:

    1. First download the latest version maven form here. For this tutorial, I have downloaded maven-3.0.4.
    2. Unzip the downloaded apache-maven-3.0.4-bin.zip. In my case, unzipped it in C:\dev\maven3.0.4.
    3. Set a new environment variable M2_HOME pointing to the directory where maven is installed or  unzipped. In case if you don't know how to set an environment variable in windows, follow the link
    4. Set another environment variable M2 with value %M2_HOME%\bin. In the same way create/update the PATH variable with value %M2% so that Maven can be accessed from command line. 
    5. Check if the PATH variable also has the value of JAVA_HOME pointing to the installed jdk.
    6. Open command prompt (WinKey + R and type cmd) and execute the command mvn --version to see if its installed well.

    Setup - Eclipse:


    For this there is a plugin for Eclipse called M2E which can be used to launch Maven builds from within Eclipse and other stuff which maven can do.
    Follow the steps given below to get M2E on eclipse:
    1. Open Eclipse.
    2. From the eclipse menu list, go to help -> Install New Software...
    3. Get maven from the update site "maven - http://download.eclipse.org/technology/m2e/releases".
      • Add the maven update site and get the list of plugins provided by it.
      • Select the plugin Maven Integration for Eclipse and press next and next.
      • Read and accept the terms of license agreement and press finish.


      • Restart eclipse.

    More on Maven:

    Feel free to share your experience/issues.